Last night I made some teriyaki jerky, as per my mother's request. It's not quite as seasoned as we wanted, so next time I'll either use only 4 pounds of meat with this much or add in some extra seasoning. As it's a good flavor, I decided to put it here for me to find again, and for any others interested.
5lbs of ground venison
1T salt
1C soy sauce
1/2C brown sugar
2t garlic powder
2t ground ginger
1t black pepper
Mix it all together with your hands in a big bowl. Shoot it with a jerky cannon, mold it with your hands or whatever way works for you. Then either use an oven or a dehydrator or a smoker to dry it out. I used my dehydrator for 8 hours at about 140 degrees. My dehydrator doesn't have the best temperature dial in the world, but I think that's the temperature it was.
This was made in Oklahoma, where humidity is nonexistent. If I were to do this in south Louisiana at home, well...8 hours just turned into about 12 or 14... :)
Wednesday, January 4, 2012


Tuesday, January 3, 2012
Dog Food (et al) Totes
I don't know where I first came across them, but subsequent searches have led me to find this awesome use for plastic dog/cat food/deer corn bags. Since we're at the camp in Oklahoma right now, I actually have a good bit of time to work on crafty stuff. I'm trying multiple patterns out to see which I like best, and then kind of making up my own. The first came from here, and my mom and I made it like that minus the lining. Here is the result:


The second and third ones I did all by myself, as my mother was busy. The second was from here. I prefer the sides and bottom of this one over the first bag, but I like the way the picture shows better on the first one.

Third off, I made my own pattern somewhat. I used this page as a basis of a pattern. I wanted the picture of the deer to show up nicely on it, and as the pattern for this cuts out everything, I drew out what I wanted on newspaper to make it fit. This is my favorite one so far that I've done.

I want to make one of these next. I don't know that I'd put it inside out for the white like they do, unless I cannibalize a puppy food bag with a cute picture on it.
Sigh. I need to learn to take some better pictures. Any suggestions?
Sunday, January 1, 2012
Making Deer Jerky
So last year for Christmas, my parents got me a refurbished dehydrator from LEM Products. That website/catalog is like a candy store. I want everything in it just about.
 That's my dehydrator. He lives in our camp/house/remote business location in Oklahoma. I use my grandma's old one at home. Anyway.
This year, since I made a good bit of deer jerky from my dad and brother's kills last year, my parents thought this would help.
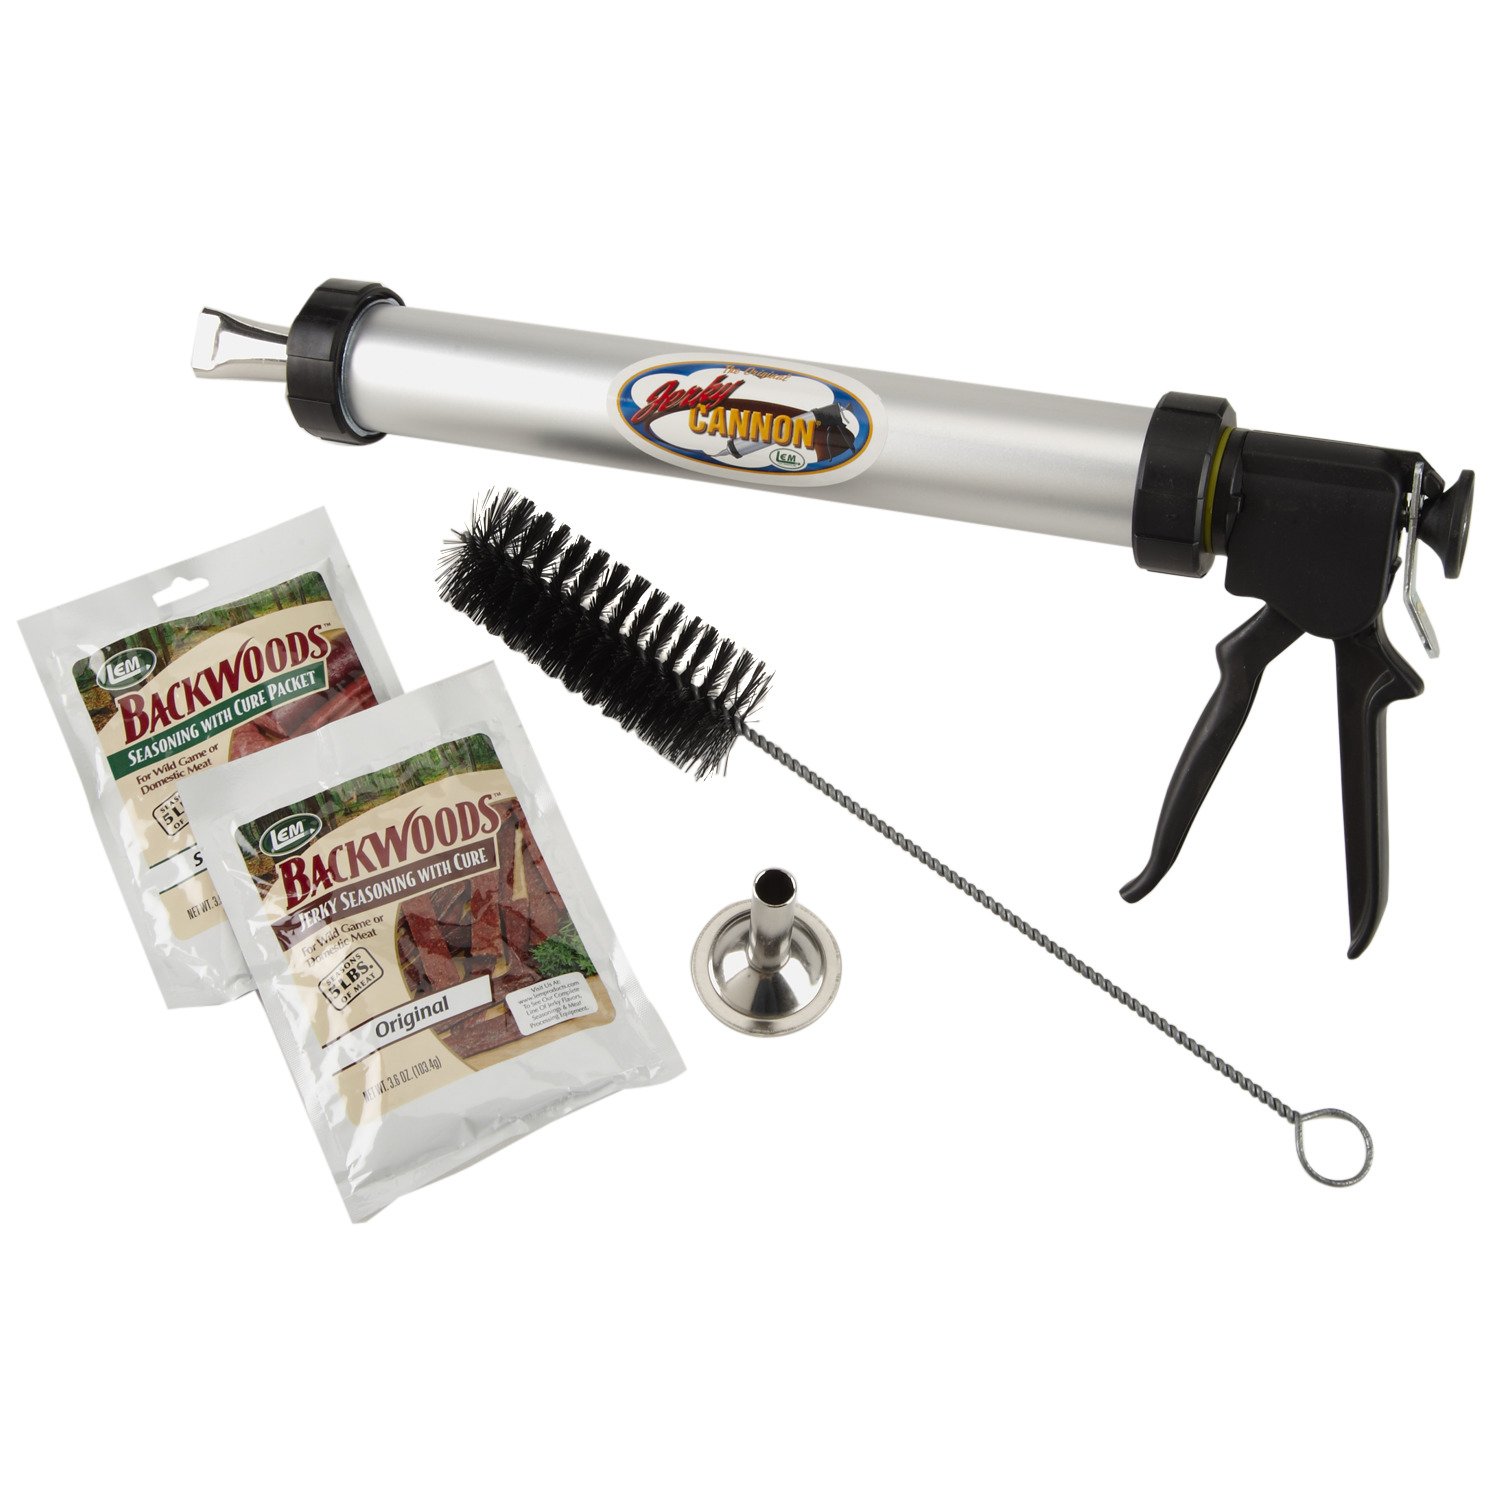
 It's a jerky cannon. Holds 1.5 pounds of ground meat and you can make either flat jerky or snack sticks. It also has a bottle brush to clean it, a barrell stomper to pack the meat in, and 2 packs of LEM's seasoning (good for 5 pounds each). Naturally, I had to make all 5 pounds of the original flavor one.
 The seasoning came with a cure packet in it. I know that technically you're supposed to use all that stuff, but the main reason that I got into drying and canning my own foods is because all those cures and preservatives make me sick. So we store the jerky in the freezer.
The cannon works like a cookie press. You pull the plug all the way back, pack the barrell full, put the tip you want on and go to town. Each of those sticks is 2 "clicks" with the handle/trigger thing. It took me under 2 hours to put together, season 5 pounds of meat, put it on the trays and wash up. I don't even want to think about how many hours that would have been by hand. 1 pound at a time took me long enough last year.
The LEM Original seasoning for jerky is pretty good. I'm more of a teriyaki person myself, but this was good. Normally I make my own seasonings or use the dry rub stuff (bbq, lemon pepper, steak seasonings, etc.) My brother likes all the weird stuff, so I make it for him.
I dried these too long when I did them, since I was worried that they might not be done enough I guess. Next time, a bit shorter would be better. The dog doesn't care though. He likes it just the way it is.
 (He was chasing my brother's eggnog.)

This year, since I made a good bit of deer jerky from my dad and brother's kills last year, my parents thought this would help.

The cannon works like a cookie press. You pull the plug all the way back, pack the barrell full, put the tip you want on and go to town. Each of those sticks is 2 "clicks" with the handle/trigger thing. It took me under 2 hours to put together, season 5 pounds of meat, put it on the trays and wash up. I don't even want to think about how many hours that would have been by hand. 1 pound at a time took me long enough last year.
The LEM Original seasoning for jerky is pretty good. I'm more of a teriyaki person myself, but this was good. Normally I make my own seasonings or use the dry rub stuff (bbq, lemon pepper, steak seasonings, etc.) My brother likes all the weird stuff, so I make it for him.
I dried these too long when I did them, since I was worried that they might not be done enough I guess. Next time, a bit shorter would be better. The dog doesn't care though. He likes it just the way it is.

Monday, December 19, 2011
Cold Process Soap!
This past summer I got interested in Cold Process Soap Making. It's really fun, especially since it allows you to minimize the amount of waste on animals that are killed/hunted. Pretty much my whole family deer hunts, so there's no point in wasting all that beautiful tallow. Same for using pork lard or beef tallow. Throw in some olive and coconut oil, a bit of lye and viola! Soap. :)


My prettiest experiments so far are as follows. Cedar soap (Hint of the Woods) because where we hunt in Oklahoma is full of cedar trees. It uses beef tallow, cedar essential oil and parsley to color it. Instead of using all that hunters soap that blocks your scent, my dad and brother use the cedar soap and just smell like a tree. It works better for them than the expensive stuff anyway. Next is Java Scrub (coffee soap). It's made with brewed coffee in it instead of water, and has coffee grounds for exfoliating purposes. Contains lard, olive oil and coconut oil. That's the pretty name for it, the real use is when my dad and brother (both like to play mechanic) come in full of grease and other grime, the coffee gets rid of the smell and the grounds scrub out the grime in their hands.

Next is Thin Mint, made with lard. I packaged it in cellophane after it cured because it has a very strong peppermint smell. Maybe I was a bit heavy handed on the essential oil there...I put half the batch colored with cocoa powder and swirled that with the regular color. My dad thinks it makes him smell like a thin mint, hence the name.

The final one is Home for the Holidays, with deer tallow, lard, coconut oil and olive oil. It's got pumpkin pie spice in the brown top of the soap. My mom got me a round cake pan and some cake decorating stuff for my birthday last week, so I played with it here. I like the smell of this one, but it's not completely cured yet. I cut holes in the bags I put them in so they can have room to cure still.

All the scents/colors I use are 100% natural, due to asthma and allergies in my family.
Sunday, December 18, 2011
Dehydrated Apples and Mixed Veggies
So we had some Red Delicious and Jonathan apples that were going kind of bad...solution? Dehydrate them! We have a lot of dehydrated slices already, so as these were softening I decided to make them into a powder for apple cinnamon oatmeal and the like. After tasting them in oatmeal, I have come to the conclusion that their flavor is not overly concentrated for something like that. You need a lot of apple to taste it in oatmeal.

Wash the apples, grab a knife, cutting board and one of those Pampered Chef choppy things (optional, I like it because it's my mom's and it's fun to play with).

Remove the cores, chop up into pieces small enough to go under the choppy thing. Chop up with that, dump in a pot and add enough water to cover.

Cook uncovered on medium heat until they're softened and most of the water is gone. Spread it on your jelly roll and stick it in the dehydrator until it's brittle.

Above is it wet, below is it dried and broken up to go in the food processor.

Powder it up, stick it in a jar (it's on the right side).

On the left is dried mixed veggies, previously frozen. They were $0.98 for a 1 pound bag at WalMart, so we got a few bags to do. When you rehydrate them for soup or something, they hold their shape and stay more firm than just using frozen or canned veggies in soup. These are really easy to do.
Open the bag. Dump contents on the dehydrator tray. Stick it in the machiene. Wash the bag. Cut it up for use in plarn (plastic yarn). Dry the veggies until they are brittle, stick them in a jar. Fill up a pint jar, and that's about the right amount for a large beef/veggie soup.


Wash the apples, grab a knife, cutting board and one of those Pampered Chef choppy things (optional, I like it because it's my mom's and it's fun to play with).

Remove the cores, chop up into pieces small enough to go under the choppy thing. Chop up with that, dump in a pot and add enough water to cover.

Cook uncovered on medium heat until they're softened and most of the water is gone. Spread it on your jelly roll and stick it in the dehydrator until it's brittle.

Above is it wet, below is it dried and broken up to go in the food processor.

Powder it up, stick it in a jar (it's on the right side).

On the left is dried mixed veggies, previously frozen. They were $0.98 for a 1 pound bag at WalMart, so we got a few bags to do. When you rehydrate them for soup or something, they hold their shape and stay more firm than just using frozen or canned veggies in soup. These are really easy to do.
Open the bag. Dump contents on the dehydrator tray. Stick it in the machiene. Wash the bag. Cut it up for use in plarn (plastic yarn). Dry the veggies until they are brittle, stick them in a jar. Fill up a pint jar, and that's about the right amount for a large beef/veggie soup.

Shared with TALU.
Monday, December 12, 2011
Making Plarn/Plastic Yarn
(still working out taking pictures, kind of bad with cameras some days...)

First off, get clean bags. If they're dirty, either wash or throw them away and find some clean ones. Lay the first victim out flat on your work surface.

Next, fold it in half.

And again.

And one last time.

Now take your cutting utensil of choice and remove the bottom of the folded bag. This is the section seamed together. Just cut off as much as needed, no need to waste any, unless you do like me and cut too much off.

Continue to cut up the bag into about one inch pieces. If they're a bit bigger, it's ok, same for being on the small side. Dispose of the handle at the top.

I used a rotary cutter today since I was sitting at the dining table and had room for the mat and wanted a change up from scissors. But my usual weapon is the scissors. I use a pair of those titanium blade ones the late craft center at WalMart had. The better your blades, the easier time you will have.This is with the scissors. Same process.

Right now I'm making a big batch of varigated colors all with white background. This is what I had cut up for colors so far this morning. The box of white next to it is going into balls of white yarn and came from the un-inked sections of bags cut for varigated.


To put your yarn together, take 2 pieces of bag. Pull them open and place bag A (strip farther to the right) over top of one half of bag B (strip on left).

Pull the right tip of bag A up through the right tip of bag B.

Pull them together firmly to make a small knot. Don't pull too hard or else it will begin to tear the bags. However, the smaller the knot you have the less it will show up in your stitches.

Ball it up, bind with a rubber band and cut up some more!

I don't just use grocery/shopping bags. I go for pretty much any kind of plastic bag that comes through my house that I can repurpose to keep it from going in the trash. These bags here are all from bread, toilet paper in big packs, carrots and the like. They are a bit harder to crochet with, but I like the look of them as well.

When crocheted, they come out looking like this:

Saturday, November 19, 2011
Dehydrating Pumpkin Pics
It's been a while. Finally getting a chance to put up some pictures of dehydrating the pumpkin. We cooked these pumpkins on top of the stove with just enough water in the bottom to keep them from sticking. Cook down until they're falling apart, then let them cool a bit. Put some plastic wrap on the dehydrator trays, then put the pumpkin on to it.
 Don't make the layer too thick or it'll take forever to dry.
After it's dried to the point of brittle, break it up a bit by hand and dump it into the blender. Small batches works better than one big one.

That's after it's blenderized. If it's still feeling a bit damp, stick it back in the dehydrator a while. The drier it is the less chance you have of spoilage. Then just dump it in a jar!

Here's some persimmons that I dried and powdered the same way. Sorry for the blurry picture. We rehydrated it with 2 cups water to 1/2 cup powder. Don't just dump all the water in at once, though. Add it bit by bit to make sure that you don't overwater it.

We used this to make a great bread with, and tossed in some pecans and dehydrated figs too. Dehydrating is a great way to use up figs, especially if you have a ton of them. Cut them up with kitchen scissors when it's time to cook with them and use like raisins - they have a much fuller flavor than you'd expect. Even someone who won't eat raw figs or fig preserves (me) loves them cooked in breads and the like.


After it's dried to the point of brittle, break it up a bit by hand and dump it into the blender. Small batches works better than one big one.

That's after it's blenderized. If it's still feeling a bit damp, stick it back in the dehydrator a while. The drier it is the less chance you have of spoilage. Then just dump it in a jar!

~~~~~~~~~~
Here's some persimmons that I dried and powdered the same way. Sorry for the blurry picture. We rehydrated it with 2 cups water to 1/2 cup powder. Don't just dump all the water in at once, though. Add it bit by bit to make sure that you don't overwater it.

We used this to make a great bread with, and tossed in some pecans and dehydrated figs too. Dehydrating is a great way to use up figs, especially if you have a ton of them. Cut them up with kitchen scissors when it's time to cook with them and use like raisins - they have a much fuller flavor than you'd expect. Even someone who won't eat raw figs or fig preserves (me) loves them cooked in breads and the like.

Subscribe to:
Posts (Atom)